
UDA Training: Methods of Insulin Administration
Diabetes Aide TrainingComplete all of the following modules:
As you complete this training course the RN responsible for delegating the task of insulin administration should be available to discuss the content and answer your questions.
Methods of Insulin Administration
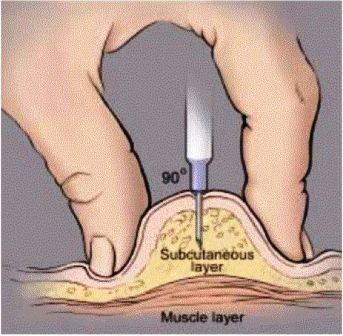
Insulin is administered by injection into the subcutaneous tissue, which is the fat layer right underneath the skin.
There are 4 main areas of the body where insulin is injected:
- Abdomen (avoid 2 inches around the navel)
- Upper arms
- Thighs
- Buttocks
Watch the video on rotating injection sites, available on the BD Company’s website . BD is a medical technology company and manufacturer. They produce medical supplies, devices, and other products, including insulin syringes and needles for insulin pens. After viewing and reading the information from BD’s website, please review the information you learned with the RN assisting you with your training.
Administering Insulin by Vial and Syringe
Review the steps in the table to identify how to draw up a dose of insulin using a vial and syringe. Then watch the video. The video demonstrates the steps and will help you prepare to practice and to safely perform this task with your delegating RN.
Follow these steps to safely draw up a dose of insulin using a vial and a syringe.
| This should be a place that provides privacy. | |
Gloves, insulin vial, insulin syringe, alcohol wipe, cotton ball, and sharps container. |
There are several types of syringes, discuss with the RN which type you will use for each person:
|
| Vials should be discarded 28 days after opening. | |
| Do not shake the vial as this may create air bubbles. | |
| Repeat as needed until bubbles are out of syringe. Bubbles will not hurt the person but will take the place of insulin in syringe so the person does not get the correct dose. | |
| Involve the person with diabetes if appropriate. | |
Review with the RN which technique to use for each person with diabetes:
|
|
| Do not recap the syringe. | |
Administering Insulin by Pen
Review the steps in the table to identify how to give a dose of insulin using an insulin pen. Then watch the video. The video demonstrates the steps and will help you prepare to practice and to safely perform this task with your delegating RN.
Follow these steps to safely give a dose of insulin using an insulin pen.
| This should be a place that provides privacy. | |
Gloves, insulin pen, pen needle, alcohol wipe, cotton ball, and sharps container. |
If the pen uses an insulin cartridge, that needs to be changed every 28 days. |
| This discard date varies based on the type of insulin in the pen. | |
| Prime pen before every injection to ensure insulin is flowing through the needle. | |
| A new pen usually requires more than one priming of 2 units. | |
| Involve the person with diabetes if appropriate. | |
Review with the RN which technique to use for each person with diabetes:
|
|
| The dial should have returned to "0". | |
|
|
| Do not recap the needle. | |
Administering Insulin by Pump
An insulin pump provides another way to deliver insulin as an alternative to the vial and syringe or insulin pen methods. The pump is filled with a 2-3 day supply of rapid-acting insulin, which is delivered by a small tube placed just underneath the surface of the skin. A pump is not surgically implanted, but rather is operated completely by the person with diabetes.
Watch the video, it demonstrates the steps for working with a pump and will help you prepare to practice and to safely perform this task with your delegating RN.
Pump Delivery Methods
The pump delivers insulin by two methods:
- Basal Rate
- Bolus
Basal Rate
Basal Rate is a continuous infusion of insulin that is delivered 24 hours a day to control blood glucose levels between meals and overnight.
Bolus
Bolus is an extra amount of insulin that is given immediately before or right after meals to bring down the blood glucose level that normally goes up after eating. Sometimes a bolus is given when snacks are eaten or to correct a high blood sugar between meals. Any extra boluses will be given at the direction of the delegating RN.
Pump Components
Components of an insulin pump include the following parts:
- Pump
- Reservoir
- Infusion Set
Pump
Pump is a device that electronically directs the administration of insulin to a person. It is a battery operated unit normally worn on a belt or waistband, but can be tucked inside clothing or carried in a small pouch. One type of insulin pump involves a "pod" worn directly on the skin; the "pod" holds the insulin.
Reservoir
Reservoir – a large syringe located in the pump that holds enough insulin for about 2-3 days.
Infusion Set
Most often the infusion set is comprised of two parts, tubing and a small plastic cannula. The tubing connects the insulin reservoir to the cannula. The cannula is a tiny plastic tube inserted into the skin, often in the abdomen or hip area, but sometimes in the upper arm or thigh. The cannula is inserted with a needle. The needle is removed immediately after the cannula is in place in the body. Also know that there are other types of infusion sets. One other type does not use a cannula but instead uses a short needle that stays in the body and is connected by tubing to the reservoir. The insulin pump that involves a small "pod" which is placed on the skin does not need tubing. It is operated by a handheld device that electronically communicates with the pod by radio frequency.
Check the following:
- The infusion site before giving a bolus of insulin to make sure the infusion set is dry and intact (attached securely).
- The infusion set to make sure it is attached to the reservoir in the pump.
Report any of the following situations to the RN immediately
Any of these situations may mean the insulin is not infusing correctly!
- The cannula (or infusion set) has pulled out.
- Tape around the edge of the infusion set is pulling up (this may make it easier for the set to fall out or to let bacteria under the skin, increasing the risk of infection around the site).
- The skin or tape around the site is wet or feels damp; or you smell insulin around the site (the cannula may have come out).
- Swelling or redness at the infusion site.
Remember
You should never change the infusion set (cannula, reservoir, or tubing). Call the RN immediately if there is a problem with the pump or any of the other components.
Giving a Bolus
Keep in mind there are many types of pumps available on the market and they all work differently. It is important that you have directions for the specific pump you will be assisting with. Your delegating RN should show you how to give a bolus with the pump and how to troubleshoot basic pump functions. The RN is responsible to work with you to make certain you can competently and safely operate the pump. The RN will go through the steps for giving a bolus with the pump. This involves:
- Checking the Diabetes Medical Management plan (DMMP) or physician orders to find out if the person you are working with needs his/her bolus before or after each meal.
- Entering the pre-meal blood glucose level into the pump.
- Entering the grams of carbohydrate anticipated to be eaten or actually eaten at the meal.
- Remember to always double check that the correct blood glucose result and carbohydrate grams are entered into the pump before giving the bolus.
- Watch the pump screen to be sure that the entire bolus is delivered.